Linux Server setup

Tutorial: Self Hosted Git Server

In this tutorial, we will host a Git service on our Cloud Server.

A Git service can be installed relatively quickly. However, for secure and productive use, further settings are required on the server. In addition, the Git server should be addressed under a subdomain and not take up the entire cloud resource.

The goal of this tutorial is to host Gitea under an encrypted subdomain in a subfolder: https://git.linuxserversetup.com/gitea.

If you want to keep the Git server hidden, you should not make the address too obvious. So it is recommended to choose rather neutral names for the subdomain and the subfolder. In this context, the subfolder contributes significantly more to security, because it would have to be guessed, so to speak. The subdomain, on the other hand, is located in the publicly accessible DNS zone file.

We start by preparing a subdomain with TLS so that we can then install any Git service. As version control software with graphical web interface we take Gitea. It is free and open source. The procedure to implement Gitea is actually clear, but allows many settings in detail. The subtleties you can adjust in the configuration file and via the web interface for you.

Next steps


DNS subdomain record

How to enter a subdomain into the DNS zone file has already been described in Configure DNS records.

As an example I name the subdomain git. However, for reasons mentioned above, it makes sense to assign a name that is not so obvious. The A-record for this would be:


git  IN  A  116.203.69.89

In my case the final zone file looks like this:


$ORIGIN linuxserversetup.com.

; SOA Records
$TTL 86400
@    IN  SOA  hydrogen.ns.hetzner.com. dns.hetzner.com. (
      2021123100  ; serial
      86400       ; refresh
      10800       ; retry
      3600000     ; expire
      3600        ; negatives caching
)

; NS Records
@    IN  NS  hydrogen.ns.hetzner.com.
@    IN  NS  oxygen.ns.hetzner.com.
@    IN  NS  helium.ns.hetzner.de.

; MX Records
@    IN  MX  10 mail

; A Records
@    IN  A  116.203.69.89
mail IN  A  116.203.69.89
www  IN  A  116.203.69.89
dev  IN  A  116.203.69.89
git  IN  A  116.203.69.89


Nginx forwarding with HTTPS

In this section, we will proceed similarly to Nginx Subdomain Server Block and Let's Encrypt Certificate for the Subdomain.

This section consists of four steps:

  • Create Nginx server configuration file
  • create empty HTML page
  • Obtain Let's Encrypt certificate
  • Implement TLS in the configuration file

Nginx Server Configuration

We first create an Nginx configuration file:


__$ sudo nano /etc/nginx/sites-available/com.linuxserversetup.git.conf
 

The contents of com.linuxserversetup.git.conf are preliminary:

/etc/nginx/sites-available/com.linuxserversetup.git.conf


server {
  listen      80;
  listen      [::]:80;
  server_name git.linuxserversetup.com;

  root        /var/www/com.linuxserversetup.git/;
  index       index.htm;

  location / {
    try_files $uri $uri/ /index.htm;
  }

  location = /favicon.ico { access_log off; log_not_found off; }
}
 

Create blank HTML page

The empty HTML page should be located at /var/www/com.linuxserversetup.git. We first create the directory path:


__$ mkdir /var/www/com.linuxserversetup.git
 

And then in it a index.htm:


__$ nano /var/www/com.linuxserversetup.git/index.htm
 

With the content:

/var/www/com.linuxserversetup.git/index.htm


<!doctype html>
<html>
  <head>
    <meta charset="UTF-8">
    <title>git.linuxserversetup.com</title>
  </head>
  <body></body>
</html>
 

We associate the configuration file with a symbolic link in the /etc/nginx/sites-enabled folder:


__$ sudo ln -s /etc/nginx/sites-available/com.linuxserversetup.git.conf /etc/nginx/sites-enabled/
 

And activate the page by checking and restarting Nginx.


__$ sudo nginx -t
__$ sudo systemctl restart nginx
 

The address http://git.linuxserversetup.com should now be accessible with a browser.

Obtain Let's Encrypt certificate

Using Certbot we apply for a certificate from Let's Encrypt:


__$ sudo certbot certonly -d git.linuxserversetup.com --rsa-key-size 4096
 

The following dialog starts:

  • Place files in webroot directory (webroot): 2
  • Enter email address
  • Input the webroot for git.linuxserversetup.com: /var/www/com.linuxserversetup.git

The new certificates should then be located under /etc/letsencrypt/live/git.linuxserversetup.com/. More precisely, links to the actual files are located there.


__$ sudo ls -la /etc/letsencrypt/live/git.linuxserversetup.com
	

Change Nginx configuration file to HTTPS

We can now implement the certificates in the configuration file we created earlier and make the following additional changes:

  • HTTPS is to be enforced
  • TLS Implementation
  • git.linuxserversetup.com should reply with the empty HTML page
  • git.linuxserversetup.com/gitea redirects to the internal port 3800

The default port of Gitea is actually 3000. I will change that later to 3800, so here is already the preparation for that.

Open and edit configuration file:


__$ sudo nano /etc/nginx/sites-available/com.linuxserversetup.git.conf
 

The modified content with the changes will look like this:

/etc/nginx/sites-available/com.linuxserversetup.git.conf


# force https
server {
  listen      80;
  server_name git.linuxserversetup.com;
  return      301 https://$server_name$request_uri;
}

# main block
server {
  listen      443 ssl http2;
  listen      [::]:443 ssl http2;
  server_name git.linuxserversetup.com;

  root        /var/www/com.linuxserversetup.git/;
  index       index.htm;

  location / {
    try_files $uri $uri/ /index.htm;
  }

  location /gitea/ {
    proxy_pass http://localhost:3800/;
  }

  location = /favicon.ico { access_log off; log_not_found off; }

  ssl_certificate /etc/letsencrypt/live/git.linuxserversetup.com/fullchain.pem;
  ssl_certificate_key /etc/letsencrypt/live/git.linuxserversetup.com/privkey.pem;
  ssl_trusted_certificate /etc/letsencrypt/live/git.linuxserversetup.com/chain.pem;

  # dhparam
  ssl_dhparam /etc/ssl/certs/dhparam.pem;

  # HSTS
  add_header Strict-Transport-Security "max-age=31536000";
}

Nginx must be restarted again due to the change:


__$ sudo nginx -t
__$ sudo systemctl restart nginx
 

This would set up the subdomain and we can start installing from the Git server.

For safety, the address https://git.linuxserversetup.com can be checked with the browser.


Install Git

Gitea is dependent on the version control software Git. We install Git with apt.

Update the package sources first:


__$ sudo apt update
 

Install Git:


__$ sudo apt install -y git
 

Get Git version:


__$ git --version
 

Create Git user

A system user git is to be responsible for all version control tasks. We will assign the Gitea system files to this user later.

Create the git user with adduser:


__$ sudo adduser --system --group --disabled-password git
	

Create database for Gitea

We had already done the MySQL installation in a previous chapter. Now we only need to create a MySQL user gitea with a database of the same name. The password is here example gitea123:


__$ sudo mysql
__gt CREATE USER 'gitea'@'localhost' IDENTIFIED BY 'gitea123';
__gt GRANT ALL PRIVILEGES ON gitea.* TO 'gitea'@'localhost';
__gt FLUSH PRIVILEGES;
__gt CREATE DATABASE gitea;
__gt exit;
	

Download and configure Gitea

We obtain Gitea from the official source using wget and store it under /usr/local/bin/gitea. At the time of writing, the current version is 1.16.9:


__$ sudo wget -O /usr/local/bin/gitea https://dl.gitea.io/gitea/1.16.9/gitea-1.16.9-linux-amd64
 

The downloaded file must then be made executable:


__$ sudo chmod +x /usr/local/bin/gitea
 

We create a folder structure for Gitea under /var/lib. There we also place a folder for custom settings that overwrites the default configuration. This allows Gitea to be updated without resetting the custom settings.


__$ sudo mkdir -p /var/lib/gitea/custom/conf
__$ sudo mkdir -p /var/lib/gitea/data
__$ sudo mkdir -p /var/lib/gitea/log
 

As mentioned before, the system user git git should be the owner of the gitea files. In addition, we also change the directory permissions to 750.


__$ sudo chown -R git:git /var/lib/gitea/
__$ sudo chmod -R 750 /var/lib/gitea/
 

Gitea still needs an /etc/gitea system folder. git also owns these files. The directory permissions should be 770 for now.


__$ sudo mkdir /etc/gitea
__$ sudo chown git:git /etc/gitea
__$ sudo chmod 770 /etc/gitea
 

With the first start the software is installed and thereby further system files are created in /etc/gitea. After that, the directory permissions can be changed again. We will come back to this later.

To make Gitea start automatically, we create a Linux service /etc/systemd/system/gitea.service. A standard file can be found here for example githubusercontent.com/go-gitea.

We create the file:


__$ sudo nano /etc/systemd/system/gitea.service
 

With this content:

/etc/systemd/system/gitea.service


[Unit]
Description=Gitea (Git with a cup of tea)
After=syslog.target
After=network.target
###
# Don't forget to add the database service dependencies
###
#
Wants=mysql.service
After=mysql.service
#
#Wants=mariadb.service
#After=mariadb.service
#
#Wants=postgresql.service
#After=postgresql.service
#
#Wants=memcached.service
#After=memcached.service
#
#Wants=redis.service
#After=redis.service
#
###
# If using socket activation for main http/s
###
#
#After=gitea.main.socket
#Requires=gitea.main.socket
#
###
# (You can also provide gitea an http fallback and/or ssh socket too)
#
# An example of /etc/systemd/system/gitea.main.socket
###
##
## [Unit]
## Description=Gitea Web Socket
## PartOf=gitea.service
##
## [Socket]
## Service=gitea.service
## ListenStream=
## NoDelay=true
##
## [Install]
## WantedBy=sockets.target
##
###

[Service]
# Modify these two values and uncomment them if you have
# repos with lots of files and get an HTTP error 500 because
# of that
###
#LimitMEMLOCK=infinity
#LimitNOFILE=65535
RestartSec=2s
Type=simple
User=git
Group=git
WorkingDirectory=/var/lib/gitea/
# If using Unix socket: tells systemd to create the /run/gitea folder, which will contain the gitea.sock file
# (manually creating /run/gitea doesn't work, because it would not persist across reboots)
#RuntimeDirectory=gitea
ExecStart=/usr/local/bin/gitea web --config /var/lib/gitea/custom/conf/app.ini
Restart=always
Environment=USER=git HOME=/home/git GITEA_WORK_DIR=/var/lib/gitea
# If you install Git to directory prefix other than default PATH (which happens
# for example if you install other versions of Git side-to-side with
# distribution version), uncomment below line and add that prefix to PATH
# Don't forget to place git-lfs binary on the PATH below if you want to enable
# Git LFS support
#Environment=PATH=/path/to/git/bin:/bin:/sbin:/usr/bin:/usr/sbin
# If you want to bind Gitea to a port below 1024, uncomment
# the two values below, or use socket activation to pass Gitea its ports as above
###
#CapabilityBoundingSet=CAP_NET_BIND_SERVICE
#AmbientCapabilities=CAP_NET_BIND_SERVICE
###

[Install]
WantedBy=multi-user.target

It is basically the default file mentioned above with only two changes:

  • Wants=mysql.service and After=mysql.service are activated.
  • The path to the web configuration file points to your own settings: /var/lib/gitea/custom/conf/app.ini.

Still missing is the web configuration file /var/lib/gitea/custom/conf/app.ini. Gitea has also published a standard app.example.ini file for this purpose. This file contains all possible options, but we do not need to use all of them. Also in the following example file some are superfluous, they should only be entered for a faster postprocessing.

We create the file:


__$ sudo nano /var/lib/gitea/custom/conf/app.ini
 

With this content:

/var/lib/gitea/custom/conf/app.ini


APP_NAME = Gitea
RUN_USER = git
RUN_MODE = prod

[security]
INSTALL_LOCK   = false
SECRET_KEY     =
INTERNAL_TOKEN =

[database]
DB_TYPE  = mysql
HOST     = 127.0.0.1:3306
NAME     = gitea
USER     = gitea
PASSWD   = gitea
SCHEMA   =
SSL_MODE = disable
CHARSET  = utf8
PATH     = /var/lib/gitea/data/gitea.db

[repository]
ROOT = /home/git/gitea-repositories

[server]
PROTOCOL         = http
SSH_DOMAIN       = linuxservrsetup.com
DOMAIN           = git.linuxservrsetup.com/gitea
HTTP_PORT        = 3800
REDIRECT_OTHER_PORT = true
ROOT_URL         = https://git.linuxservrsetup.com/gitea
DISABLE_SSH      = false
SSH_PORT         = 22123
LFS_START_SERVER = true
LFS_CONTENT_PATH = /var/lib/gitea/data/lfs
LFS_JWT_SECRET   =
OFFLINE_MODE     = false

[mailer]
ENABLED = true
SUBJECT_PREFIX = GITEA:
FROM = "GITEA" <gitea@linuxservrsetup.com>
USE_SENDMAIL = true
SENDMAIL_PATH = /usr/sbin/sendmail

[service]
REGISTER_EMAIL_CONFIRM            = false
ENABLE_NOTIFY_MAIL                = true
DISABLE_REGISTRATION              = false
ALLOW_ONLY_EXTERNAL_REGISTRATION  = false
ENABLE_CAPTCHA                    = false
REQUIRE_SIGNIN_VIEW               = true
DEFAULT_KEEP_EMAIL_PRIVATE        = true
DEFAULT_ALLOW_CREATE_ORGANIZATION = true
DEFAULT_ENABLE_TIMETRACKING       = true
NO_REPLY_ADDRESS                  = noreply@linuxservrsetup.com

[picture]
DISABLE_GRAVATAR        = false
ENABLE_FEDERATED_AVATAR = true

[openid]
ENABLE_OPENID_SIGNIN = false
ENABLE_OPENID_SIGNUP = false

[session]
PROVIDER = file

[log]
MODE      = file
LEVEL     = info
ROOT_PATH = /var/lib/gitea/log

[repository]
DEFAULT_BRANCH = main

The following parameters must be observed here:

  • all domain names
  • all e-email addresses
  • the HTTP_PORT
  • the SSH_PORT
  • SECRET_KEY, INTERNAL_TOKEN and LFS_JWT_SECRET are generated automatically

We also need to pass the file to the git user.


__$ sudo chown -R git:git /var/lib/gitea/
 

We can start Gitea and also set up the service so that it always starts up when the server is restarted.


__$ sudo systemctl enable gitea
__$ sudo systemctl start gitea
	

Install Gitea and create administrator

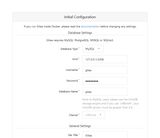
Gitea is now ready to run the first startup, which triggers an installation process by INSTALL_LOCK = false. The options made now at the Web Installer will automatically overwrite the last created configuration file /var/lib/gitea/custom/conf/app.ini. So we call the Gitea web address https://git.linuxserversetup.com/gitea and create an administrator over it, among other things. The "Email notifications" option can also be enabled at this point (ENABLE_NOTIFY_MAIL). This will notify repository observers about events via email.

One more note: The next section describes how to disable the public registry. This can also be set already now in the installation process via the web interface.

Install Gitea and create administrator:
Gitea Web Installer
Error page after installation

After the installation we land on an error page, which is typical. The page then just needs to be reloaded.
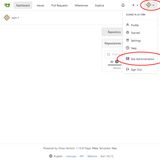
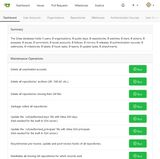
Gitea dashboard
Open Gitea settings
Gitea settings

The Git server is now ready and operational.

If the /etc/gitea folder still exists after installation, which may not be the case in newer Gitea versions, you can lower the access rights of it:


__$ sudo chmod 750 /etc/gitea
 

Disable public registration

If you don't want to share Gitea publicly, you should enable DISABLE_REGISTRATION registration:

We open the web configuration again:


__$ sudo nano /var/lib/gitea/custom/conf/app.ini
 

And change the parameter:

Excerpt from /etc/systemd/system/gitea.service


...
DISABLE_REGISTRATION = true
...

Restart Gitea to apply the changes:

/etc/systemd/system/gitea.service


__$ sudo systemctl restart gitea
 

All settings are documented at Gitea Configuration Cheat Sheet.


Uninstall Gitea

How to uninstall Gitea is described here only for the sake of completeness.

Stop Gitea:


__$ sudo systemctl stop gitea
	

Output firewall rules:


__$ sudo ufw status numbered
 

Delete Gitea Firewall rule with number:


__$ sudo ufw delete [RULENUMBER]
 

Delete Gitea files:


__$ sudo rm -R /etc/gitea
__$ sudo rm /etc/systemd/system/gitea.service
__$ sudo rm -R /var/lib/gitea
__$ sudo rm /usr/local/bin/gitea
	

Delete system user git:


__$ sudo deluser --remove-home git
__$ sudo groupdel git
	

Gitea MySQL user and database delete via the MySQL:


__$ sudo mysql
__gt DROP DATABASE gitea;
__gt DROP USER 'gitea'@'localhost';
__gt exit;
	

Update systemd:


__$ sudo systemctl daemon-reload
	

Check if the Gitea service still exists:


__$ sudo systemctl status gitea
	

Useful Gitea commands

Start, stop, restart Gitea, status:


__$ sudo systemctl start gitea
__$ sudo systemctl stop gitea
__$ sudo systemctl restart gitea
__$ sudo systemctl status gitea
 

systemd protocol from the Gitea service (follow -f):


__$ sudo journalctl -u gitea -f
	

Gitea Logs (if MODE = file):


__$ sudo ls /var/lib/gitea/log/
__$ sudo less /var/lib/gitea/log/gitea.log
__$ sudo tail -f /var/lib/gitea/log/gitea.log