Linux Server setup

Create RSA key

In this part we will create a key pair on the local computer. We will transfer the public key to the server, while the private key will remain "protected" on the computer.

In this subsection, we will prepare the key pairs for the key-based authentication method.

The topics of cryptographic encryption and authentication are beyond the scope of this tutorial, so the focus is mainly on creating and configuring them.

Next as:


Generate key pair under Windows

PuTTY's own key format .ppk is generated with the software PuTTYgen. After downloading and installing, we open PuTTYgen:

PuTTYgen

With PuTTYgen we create a private key and save it under private-key.ppk. It makes sense to export this key into the OpenSSH format to be able to establish a key-based connection with other software later on. With the private key we generate a matching public key, which we then transfer to the server.

We set the parameters to RSA and the bit depth to 4096. To generate just click on Generate. In the empty gray area, the mouse pointer must be moved back and forth. These arbitrary movements are included in the calculation of the key. The progress bar informs about how long the movements have to be executed. The higher the bit depth, i.e. the complexity, the longer it takes. After the key is temporarily created, we enter a passphrase, which additionally AES-CBC encrypts the key.

set parameters generate key
move mouse pointer back and forth
key created
Enter passphrase

We save the public key with Save public key. The file extension can be for example .txt. We will store the content of this file later on our server.

save public key
store as public-key.txt

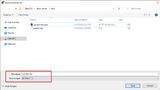
Similar procedure for the private key. This time we click Save private key and do not assign a file extension. The file extension .ppk is assigned automatically.

save private key
store as private-key.ppk

The private key in OpenSSH format is still missing. For this we open the menu Conversions and export with Export OpenSSH key. We save this file as private-key without file extension.

private OpenSSH key
store as private-key

Before you close PuTTYgen, you should copy the key from the upper field. In this form, starting with "ssh-rsa" and all in one line, it is readable for the SSH service. We will copy this key to the server in a moment.

copy key from text field

If necessary, we can also reconstruct it with the saved public key. The RSA key looks like this in my case:


ssh-rsa AAAAB3NzaC1yc2EAAAABJQAAAQEAtX9gXr8jJm5p6sqSGelcGjV0oov5OsTH2cGkYNfArq+jnhswBG52GsOSDy05EJjcGOeSuo4rr+vp/iUpl9Q3H/45k3T8AcLmnSZwzhWoxOs2mE9Esyrv6Ki4us4WJr2F8m7BbE5sym5kDOmUqSr1upT5THzccFDfNmtr9tQtYDls720/QcZ3SUk0ZDJTsyyHpe3vDUq4qcXgzKXpBhk58wsFcbKyeV+kAG8kzcdKPapmhswmP5KgtsHsGHwBZoyAS9nmDPSkxRmn18UgZjEY+wwBdGmcyTKwaphMcB6Ja+Tpu8iZLxjPATdqTmIO0AVEhDw7pCuO/9yoQf2WKkUdiQ== 
	

Done! Our key pair is now in different file formats on our computer. You should not lose the private key and the passphrase, because without the key you (and nobody else) will not be able to access the server later after the changeover.

Store public key on the server

We have to write the content of the public key file in the user directory of tom under Home into the file ~/.ssh/authorized_keys. To make sure you are logged in with the right user, you can check this with whoami:


__$ whoami
 

It is quite possible that the file does not exist yet. Therefore, we first create the ~/.ssh folder with mkdir:


__$ mkdir ~/.ssh
 

After that we create the file ~/.ssh/authorized_keys with nano and can enter the content of the public key at the same time:


__$ nano ~/.ssh/authorized_keys
 

And paste the key with the right mouse button. Just save and you're done. (CTRL+s, CTRL+x).

~/.ssh/authorized_keys


ssh-rsa AAAAB3NzaC1yc2EAAAABJQAAAQEAtX9gXr8jJm5p6sqSGelcGjV0oov5OsTH2cGkYNfArq+jnhswBG52GsOSDy05EJjcGOeSuo4rr+vp/iUpl9Q3H/45k3T8AcLmnSZwzhWoxOs2mE9Esyrv6Ki4us4WJr2F8m7BbE5sym5kDOmUqSr1upT5THzccFDfNmtr9tQtYDls720/QcZ3SUk0ZDJTsyyHpe3vDUq4qcXgzKXpBhk58wsFcbKyeV+kAG8kzcdKPapmhswmP5KgtsHsGHwBZoyAS9nmDPSkxRmn18UgZjEY+wwBdGmcyTKwaphMcB6Ja+Tpu8iZLxjPATdqTmIO0AVEhDw7pCuO/9yoQf2WKkUdiQ== 

The steps shown with screenshots:
paste with right mouse button
CTRL+x to close, type y to save
confirm with Enter

To be really sure if the public key has been saved, we check with less:


__$ less ~/.ssh/authorized_keys
 

The output should look something like this:

content of authorized_keys (quit with q)

The public key is now stored on the server, which is wonderful, but doesn't do us any good yet. We still need to change the SSH authentication method. We will do that in the next chapter: Change authentication method.


Generate key pair on Mac and Linux

We create a key pair on Mac or Linux locally via the terminal with the command ssh-keygen. If you are still logged in on the server, you should log out with logout.

Let's first create a folder where the key pairs will be copied into:


__$ cd
__$ mkdir linux-server
 

With ssh-keygen we create a private and a public key. The bit depth, i.e. the complexity, should be 4096 bits. We protect the private key additionally with a passphrase:


__$ ssh-keygen -b 4096
 

A message appears that the private and public keys are being generated, followed by the request to select a storage location. We have already created the folder. The path with YOUR_USERNAME is /home/YOUR_USERNAME/linux-server. After that we set a passphrase.

This looks something like this:


Generating public/private rsa key pair.
Enter file in which to save the key (...):
Enter passphrase (empty for no passphrase):
Enter same passphrase again:
Your identification has been saved in ...
Your public key has been saved in ....pub
The key fingerprint is:
SHA256:lMynD1M8dxOHtUPmXur8Q3z0iHS3mVC7hslJtmyeaJ8
The key's randomart image is:
+---[RSA 4096]----+
|              .=o|
|       o o    =+.|
|        = = . ++o|
|       . + o.=o+=|
|        S  .=oO=*|
|         +  .@.Oo|
|          . + * .|
|           o o.o |
|          . .E  o|
+----[SHA256]-----+

Let's briefly check if the keys are really there:


__$ ls linux-server
 

All that remains is to write the contents of the public key, which is now local, to the file ~/.ssh/authorized_keys on the server. This file is located in the home directory of user tom. This can be done by "copy and paste" or even easier with the command ssh-copy-id:


__$ ssh-copy-id -i linux-server/id_rsa.pub tom@116.203.69.89
 

Let's log in as tom and take a quick look to see if it all worked out:


__$ ssh tom@116.203.69.89
 

With the less command, we output the contents of the key file ~/.ssh/authorized_keys:


__$ less .ssh/authorized_keys
 

The output should look something like this:

content of authorized_keys (quit with q)

The public key is now stored on the server, which is wonderful, but doesn't do us any good yet. We still need to change the SSH authentication method. We will do that in the next chapter: Change authentication method.

Transfer public key manually

In case it didn't work with the ssh-copy-id command. You can also add the key manually to the ~/.ssh/authorized_keys file.

Let's first create the ~/.ssh folder with mkdir:


__$ mkdir ~/.ssh
 

After that we create the file ~/.ssh/authorized_keys with nano and can enter the content of the public key at the same time:


__$ nano ~/.ssh/authorized_keys
 

And paste the key with the right mouse button. Just save and you're done. (CTRL/CMD+s, CTRL/CMD+x).

~/.ssh/authorized_keys


ssh-rsa AAAAB3NzaC1yc2EAAAABJQAAAQEAtX9gXr8jJm5p6sqSGelcGjV0oov5OsTH2cGkYNfArq+jnhswBG52GsOSDy05EJjcGOeSuo4rr+vp/iUpl9Q3H/45k3T8AcLmnSZwzhWoxOs2mE9Esyrv6Ki4us4WJr2F8m7BbE5sym5kDOmUqSr1upT5THzccFDfNmtr9tQtYDls720/QcZ3SUk0ZDJTsyyHpe3vDUq4qcXgzKXpBhk58wsFcbKyeV+kAG8kzcdKPapmhswmP5KgtsHsGHwBZoyAS9nmDPSkxRmn18UgZjEY+wwBdGmcyTKwaphMcB6Ja+Tpu8iZLxjPATdqTmIO0AVEhDw7pCuO/9yoQf2WKkUdiQ== 

The steps shown with screenshots:
paste with right mouse button
CTRL/CMD+x to close, type y to save
confirm with Enter

As before, you should check if the key was saved correctly:


__$ less .ssh/authorized_keys