Before we create a virtual machine, we download the Ubuntu Server 20.04.1 LTS image from the Ubuntu download page. Unlike the usual Ubuntu distribution, this one does not have a graphical user interface and has only the bare essentials integrated. Thus, it runs quite stable even on low-powered systems.

To keep the order, I create a new folder where I copy the ISO file. In my case the folder "linux-server" on the harddisk D (D:\linux-server). You will surely have your own organization. I can only recommend that you also create a folder where you can place files within the scope of this guide.
Create VM
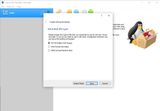
We switch to VirtualBox and with a click on "New" we create a virtual machine. A series of dialogs starts where we enter the following:
-
Name and operating system:
- Name: Ubuntu
- Machine Folder: D:\linux-server
- Typ: Linux
- Version: Ubuntu (64-bit)
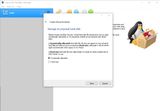
- Memory size/RAM: 2048 MB (or more)
- Hard disk: create a virtual hard disk now
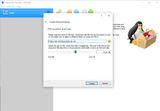
- Hard disk file type: VDI (VirtualBox Disk Image)
- Storage: Dynamically allocated
- File location and size: D:\linux-server\Ubuntu\Ubuntu.vdi
- Virtual hard disk size: 10,00 GB (or more)
After clicking "Create", we see the new VM "Ubuntu" in the left list on the overview page, which is turned off.

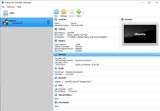
Mount Ubuntu Image
Before we can start the machine, we still need to mount the Ubuntu Server ISO image and configure the network. We open the settings of this VM:

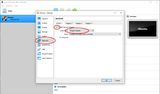
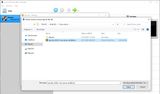
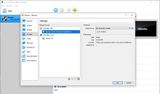
First, mount the image. In the "Storage" section, we select the empty drive. A CD icon appears on the right under Attributes, and we select our Ubuntu image from its context menu. The image finally appears under the IDE controller as an inserted medium.

Configure VM network
Finally, a network adapter must be assigned to the VM.
Under the "Network" section, we select the "Adapter 1" tab, activate it and set the port to "Bridged Adapter". As you can see from the name, this port bridges the network communication from Ubuntu Server to the network card. In my case it is one from Realtek, it may be something different for you. Usually VirtualBox detects the active card and puts it in the pre-selection.